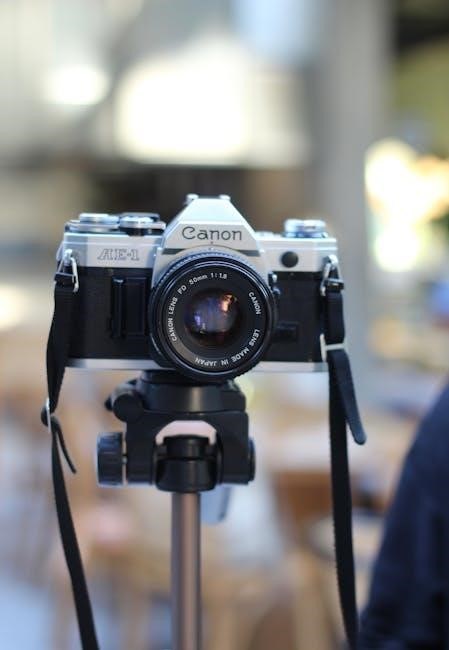
canon ae 1 program instruction manual
The Canon AE-1 Program is a 35mm SLR film camera introduced in 1981, known for its versatility and ease of use, popular among photographers of all levels.
1.1 Overview of the Camera
The Canon AE-1 Program is a 35mm SLR film camera featuring program autoexposure, aperture-priority mode, and manual override. It offers a built-in self-timer, multiple exposure capability, and compatibility with Canon FD lenses. Designed for versatility, it balances automatic and manual controls, making it a favorite among photography enthusiasts since its release in the 1980s.
1.2 Historical Background and Popularity
Introduced in 1981, the Canon AE-1 Program became a beloved camera for photographers due to its user-friendly design and advanced features. Part of the AE-1 series launched in 1976, it combined automatic and manual controls, appealing to both amateurs and professionals. Its popularity endured, making it a timeless choice in film photography, cherished for its reliability and creative flexibility.

Accessing the Canon AE-1 Program Manual
The Canon AE-1 Program manual is available online for free download in PDF format, offering detailed instructions on camera features, operation, and troubleshooting.
2.1 Online Sources for the Manual
The Canon AE-1 Program manual is widely available online for free. Websites like ManualsDir.com and manua.ls provide direct links to download the PDF version without registration. Additionally, Canon’s official website offers detailed guides and specifications. These online sources ensure easy access to comprehensive instructions, making it simple for users to understand and operate their camera effectively.
2;2 Downloading the PDF Version
The Canon AE-1 Program manual can be downloaded as a PDF file from various online sources. The PDF version is typically around 8 MB and includes detailed instructions, specifications, and diagrams. Websites like ManualsDir.com and manua.ls offer direct download links. Once downloaded, users can access the manual offline, making it convenient for reference while using the camera.

Key Features of the Canon AE-1 Program
The Canon AE-1 Program features program autoexposure, aperture-priority mode, and manual controls. It uses a Canon FD lens mount, offering compatibility with various lenses. The camera includes a built-in self-timer, multiple exposure capability, and is lightweight yet durable, making it a versatile and reliable choice for photographers.
3.1 Program Autoexposure Mode
The Program Autoexposure Mode automatically selects both aperture and shutter speed for optimal exposure. This user-friendly feature is ideal for beginners, as it simplifies shooting while delivering consistent results. The camera’s built-in light metering system ensures accurate exposures, making it a reliable choice for various lighting conditions. This mode combines automation with the camera’s manual controls, offering flexibility for photographers.
3.2 Aperture-Priority Mode
Aperture-Priority Mode allows users to set the desired f-stop, with the camera automatically adjusting the shutter speed for proper exposure. This mode provides creative control over depth of field, enabling photographers to isolate subjects or ensure sharpness throughout the image. The aperture range varies by lens, offering flexibility for artistic expression while maintaining accurate exposure through the camera’s metering system.
3.4 Manual Controls and Flexibility
The Canon AE-1 Program offers manual override, allowing photographers to adjust aperture and shutter speed independently for precise control. The aperture ring on the lens and the shutter speed dial provide tactile adjustments, while compatibility with Canon FD lenses expands creative possibilities. This flexibility, combined with the camera’s simplicity, makes it a reliable tool for photographers seeking hands-on control over their shots.

Loading Film into the Camera
Insert the film cartridge, draw the leader across the film plane, and secure it in the take-up spool. Advance the film until the start mark aligns with the red index.
4.1 Inserting the Film Cartridge
To load film, open the camera back and align the film cartridge’s slot with the take-up spool. Gently insert the cartridge, ensuring it clicks into place. Close the back, making sure it is securely latched. The film leader should align with the red index mark on the spool. This ensures proper loading and prepares the camera for advancing the film.
4.2 Advancing the Film
To advance the film, turn the film advance lever clockwise until it stops. This ensures the film is properly seated and ready for the first exposure. The start mark on the film leader should align with the red index mark on the take-up spool. Once aligned, the film counter will show the correct frame number, typically starting at 1.

Setting Up the Camera
Adjust the shutter speed dial to your desired setting, ranging from 1 second to 1/1000th of a second. Use the exposure compensation dial to fine-tune settings based on lighting conditions.
5.1 Adjusting the Shutter Speed
Rotate the shutter speed dial on the top of the camera to select your desired setting. The available speeds range from 1 second to 1/1000th of a second, with corresponding numbers and symbols on the dial. This allows you to control the duration of exposure, balancing motion and lighting effectively in your shots.
5.2 Using the Exposure Compensation Dial
Use the exposure compensation dial located on the top-left of the camera; Turn the dial to adjust exposure settings according to lighting conditions. Positive values (+) increase exposure, while negative values (-) reduce it, allowing you to fine-tune your shots for optimal results in various lighting scenarios.

Focusing and Composing Shots

Adjust the focus ring for sharpness and use viewfinder aids like the split-image or microprism for precise focus. Compose shots using the viewfinder’s guides for balanced framing.
6.1 Adjusting the Focus
Turn the focus ring on the lens until your subject appears sharp in the viewfinder. Use the split-image or microprism focusing aids in the center of the viewfinder for precise focus adjustment. These tools help ensure your subject is clear and well-defined, making it easier to achieve professional-quality images with the Canon AE-1 Program.
6.2 Using the Viewfinder Aids
The Canon AE-1 Program’s viewfinder features split-image and microprism focusing aids. The split-image aid divides the subject, aligning when in focus. The microprism provides a textured, bright area for precise adjustments. Together, these tools help achieve sharp focus quickly, ensuring optimal clarity and composition in your photography with the Canon AE-1 Program.

Exposure Modes and Settings
The Canon AE-1 Program offers three exposure modes: Programmed AE, Shutter-Speed Priority AE, and Manual Override. These modes simplify manual adjustments, blending automation with creative control for diverse lighting conditions.
7.1 Programmed AE Mode
The Programmed AE Mode automatically selects the optimal aperture and shutter speed for a given scene, ensuring accurate exposures. This mode is ideal for beginners and professionals alike, as it combines the camera’s built-in light metering system with advanced electronics to deliver consistent results. It simplifies photography by minimizing manual adjustments, allowing users to focus on composition and creativity while the camera handles technical settings.
7.2 Shutter-Speed Priority AE Mode
In Shutter-Speed Priority AE Mode, users can manually set the desired shutter speed, and the camera automatically adjusts the aperture to ensure proper exposure. This mode is ideal for controlling motion effects, such as freezing fast-moving subjects or creating motion blur. Shutter speeds range from 1 second to 1/1000th of a second, offering flexibility for various lighting conditions and creative goals. The camera’s metering system ensures accurate aperture settings, balancing user control with automation for optimal results.
7.3 Manual Override
The Manual Override mode allows photographers to bypass automatic settings, enabling full control over both aperture and shutter speed. This feature is ideal for experienced photographers who prefer precise control. The built-in light meter assists in determining the correct exposure, and adjustments can be made using the aperture ring and shutter speed dial. This mode offers creative freedom for achieving specific artistic effects in various lighting conditions.

Advanced Features and Capabilities
The Canon AE-1 Program features a built-in self-timer and multiple exposure capabilities, enabling photographers to explore creative techniques and enhance their shooting experience with precision and control.
8.1 Built-In Self-Timer
The Canon AE-1 Program includes a built-in self-timer, allowing photographers to take photos with a 10-second delay. This feature is ideal for avoiding camera shake and including the photographer in group shots. To use it, set the camera to self-timer mode, press the shutter button, and wait for the timer to complete. The self-timer also features a flashing LED indicator to signal the countdown, ensuring precise timing. Additionally, the self-timer can be canceled mid-countdown for added flexibility.
8.2 Multiple Exposure Function
The Canon AE-1 Program offers a multiple exposure function, enabling photographers to capture several images on a single frame of film. This feature is activated by setting the film advance lever to the “ME” position. After each exposure, the photographer can manually advance the film, allowing for creative layering and unique compositions. The camera does not automatically reset between exposures, giving full control to the user. This feature is particularly useful for experimental and artistic photography, allowing for the creation of intricate and layered images without the need for post-processing. By leveraging the multiple exposure function, photographers can push the boundaries of traditional film photography and achieve distinctive visual effects.
Troubleshooting Common Issues
Identify issues like exposure errors or focusing problems by checking settings, ensuring proper film loading, and using viewfinder aids for accurate adjustments and troubleshooting.
9.1 Resolving Exposure Problems
Exposure issues can often be resolved by adjusting the exposure compensation dial or checking the film speed settings. Ensure proper use of the built-in light meter for accurate readings. If overexposed, decrease exposure by turning the dial left; if underexposed, increase by turning right. Reviewing test shots and understanding the metering system can help diagnose and correct exposure errors effectively.
9.2 Addressing Focusing Difficulties
Focusing issues can be resolved by using the viewfinder’s split-image and microprism aids for precise focus. Ensure the lens is clean and free of smudges. If focus remains inconsistent, check the lens alignment or consult a professional. Proper technique, such as focusing on high-contrast areas, can also improve accuracy and sharpness in your photographs.
The Canon AE-1 Program is a timeless camera offering versatility and creative control. Master its techniques and enjoy capturing life’s moments with precision and artistry.
10.1 Final Tips for Using the Canon AE-1 Program
Regularly clean the lens and viewfinder for optimal performance. Experiment with different film speeds and modes to enhance creativity. Store the camera in a cool, dry place to preserve its mechanics. Familiarize yourself with the manual to unlock all features. Practice makes perfect—enjoy the journey of mastering this iconic camera!